|
Now, time to color. First I create a new layer and then set the layer to 'Multiply'. This is
done so that when i color the picture in, the black lines stay. After i color it, uh....i'm done coloring.
So this is a quick step. If I skip step 2, which is sometimes the case the picture will end up looking
like Figure 3b. |
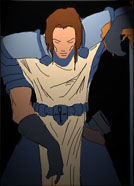 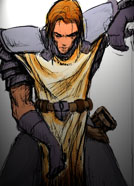 Figure 3a & 3b - With Step 2 & without Step 2 coloring Figure 3a & 3b - With Step 2 & without Step 2 coloring |
|
Step Numero Quatro: |
Shading |
|
To shade, i do it in sections and by color. So while still on the layer that has the color i select the area i want to shade using the 'magic wand'. Then using the Dodge/Burn (Dodge set on 'Highlights') tool I go in and make areas darker or lighter (Its easy to switch between dodge and burn by just pressing down the ALT key while you draw.)
Sometimes if the dodge/burn tool isn't working for me i go in with the airbrush and just shade it manually.
|
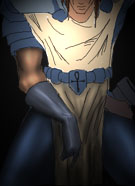 Figure 4 - Shading Figure 4 - Shading |
|
Step Numero Cinco: |
Smudging |
|
Once i got my main shading down, i then 'flatten' all layers and use the 'Smudge' tool to go over the solid lines that i originally had laid down. For lines that define edges, i smudge along with the line and for lines that define shaded areas I smudge against the line.
Depending on how careful you are in this step it you wont need to go back later on to fix areas. In the example on the right i wasn't too careful (as is often the case) because i rather go in after and fix it with all the detail and stuff. This step is especially necessary if I skip step two. Here is where all those sketchy lines dissappear.
|
 Figure 5 - Smudging Figure 5 - Smudging |
|