|
Step Numero Seis: |
Refinement
|
|
Now comes part one of the most tedious and time consuming part. Refining the drawing so it looks nice and clean and not all smudgy. This step is kinda hard to explain because it is just a whole lot of stuff done together.
But if i were to sum it up in a few sentences i'd say it involves a lot of zooming in and using the 'paintbrush' tool to clean up areas, define edges and add bits of detail here and there. Also this is where i define my shapes better and add detail to the face. In Figure 6 notice that the arm muscles are a lot more defined than the previous step.
|
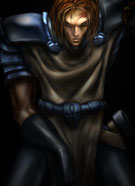 Figure 6 - Refinement Figure 6 - Refinement |
|
Step Numero Siete: |
Detailing |
|
Detailing is part two of the time consuming part. Its actually the same thing as refinement but just one step further. This is where i go in and add dents and scratches and veins in the arm etc. Sometimes i may add a glow or anything else that will add to the mood of the picture. Hmmm...maybe this is more Step Six and a half.
|
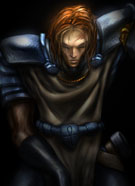 Figure 7 - Detailing Figure 7 - Detailing |
|
Step Numero Ocho: |
Wrapping it up |
|
And finally, when everything is just right, add i add in an environment. Some sort of setting to describe whats going on in the picture. For this picture I decided to go with rain (yeah, thats supposedly what those lines are, but hey, its my first time drawing rain, so i'll keep practicing)
So for this picture I added a partial reflection, some fog and a bunch of rain. The tools i used where mainly the dodge tool and the airbrush for the glow. Tip: When adding a glow using the Airbrush, set it to 'Lighten'. Maybe I overdid it a little with this picture, but you get the idea :-)
|
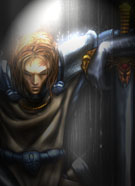 Figure 8 - The Final Cut Figure 8 - The Final Cut |
|